

With recent updates to SFAM, users can now track CIP directly within the system, giving teams a more structured way to accumulate costs.
Construction in progress (CIP) is often one of the more difficult areas of fixed asset accounting to manage efficiently. Organizations frequently track project costs across spreadsheets, project dimensions, or other manual processes until an asset is ready to be placed in service. That approach can make it harder to maintain visibility, support reporting, and ensure a smooth capitalization process.
With recent updates to Sage Fixed Asset Management (SFAM), users can now track CIP directly within the system, giving teams a more structured way to accumulate costs, monitor project balances, and transition completed projects into depreciable assets.
What is construction in progress (CIP)?
CIP is a holding cost buckets related to a future completed asset. Common use cases of CIP include buildings, renovation projects, infrastructure, and customized equipment. Typical costs include materials, labor, and permits — costs not expensed as incurred and not depreciated until the project is completed and placed in service.
How do I enable CIP functionality?
If you are already subscribed to Fixed Asset Management, you are a few short clicks (and no additional cost) from being able to efficiently, reliably, and accurately track CIP costs for new and in-progress projects.
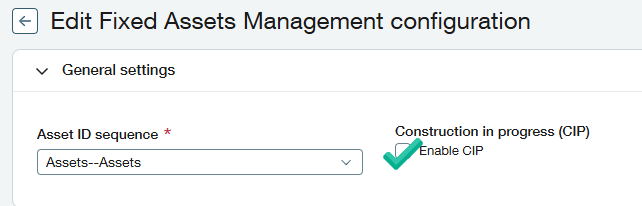
Step 1
Under your FAM configuration settings, you’ll see an “Enable CIP” checkbox. Select the checkbox and save your changes.
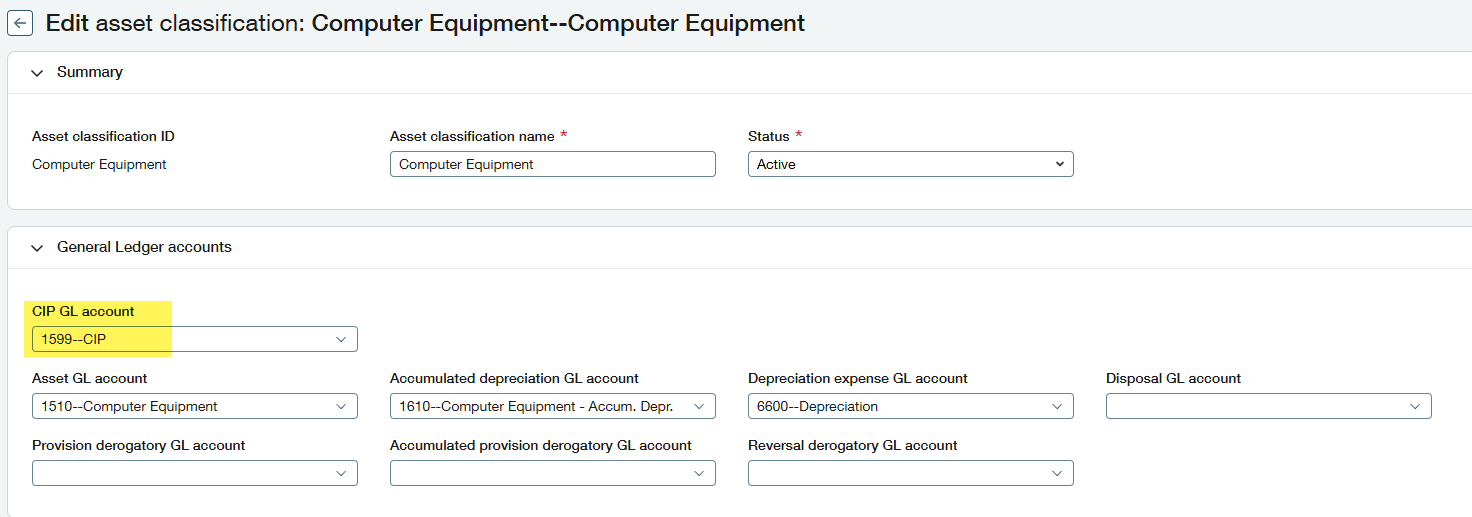
Step 2
Update your existing (or new) asset classifications to link your CIP GL Account.
Tip: If you don’t already have a dedicated account for CIP, you’ll want to set up a new non-current asset account.
You are now ready to begin tracking CIP costs on AP bills and purchasing transactions.
How do I treat my current projects?
If you are enabling CIP, you likely track costs associated with current projects or renovations that may be tracked using your project dimension or manually in Excel. To take advantage of these new features, you’ll want to bring this information into the FAM module.
This is done by adding a new asset (don’t worry, we won’t be placing into service yet) and specifying it’s specific to CIP (another new checkbox). You’ll want to set up one CIP asset per future asset you anticipate capitalizing.
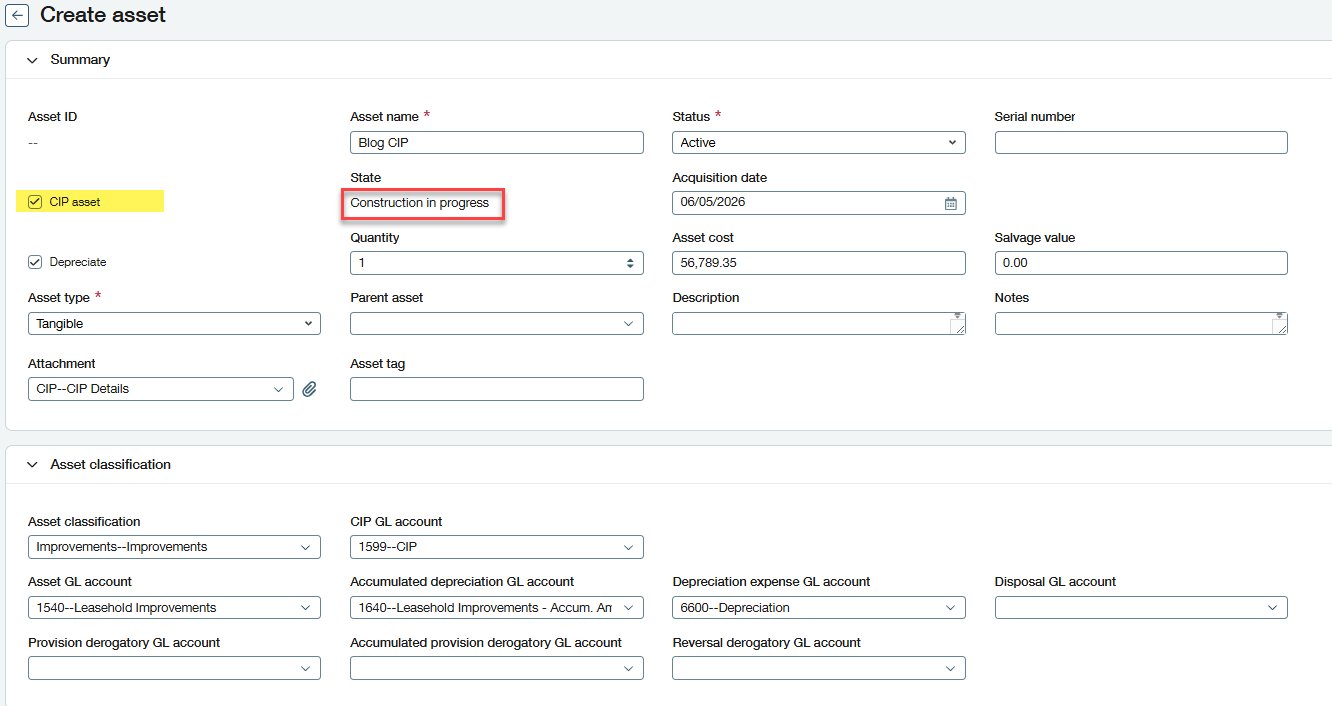
By checking the CIP box, the asset state will populate as construction in progress, and asset cost will become a non-required field. This allows you to set up new CIP assets before any costs have been incurred so they are available when coding new bills. You can also automatically create a CIP asset upon the first bill arriving.
For these historical CIP assets, you’ll want to populate the asset cost with the exact amount currently assigned to your project so that when going forward, new costs are added until you reach the point of capitalization. You won’t be able to track this detail historically, but you can upload supporting documentation to the asset for reconciliation purposes.
You’ll also want to associate this asset with an asset classification to default the CIP account. If you have multiple CIP accounts, you can still override on an asset-by-asset basis. A location/entity will also be required.
How do I assign new costs?
Once the setup is complete, you’ll be able to assign new costs to the appropriate CIP asset whether you process vendor invoices through accounts payable or purchasing. As you code bills to a CIP account you’ll have three options:
1. Create CIP asset: Used when no existing CIP is appropriate. This creates a new CIP asset, marking this the first cost of asset assignment.
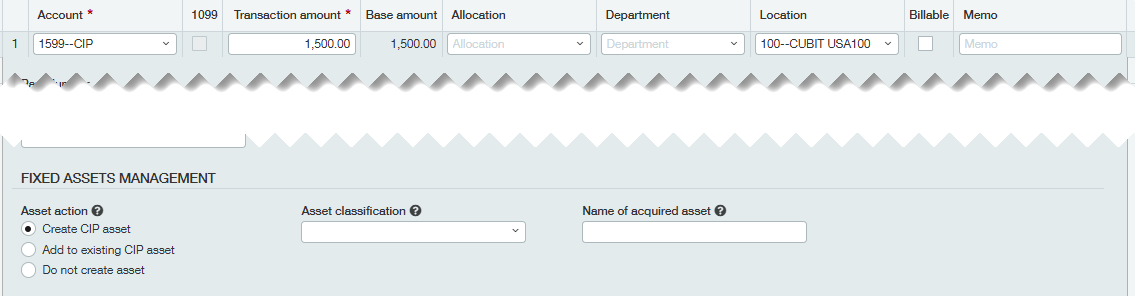
2. Add to existing CIP asset: Used to add costs to an existing CIP asset.

3. Don't create asset: This won't associate this cost with any CIP asset, but it can be edited or reclassified later.
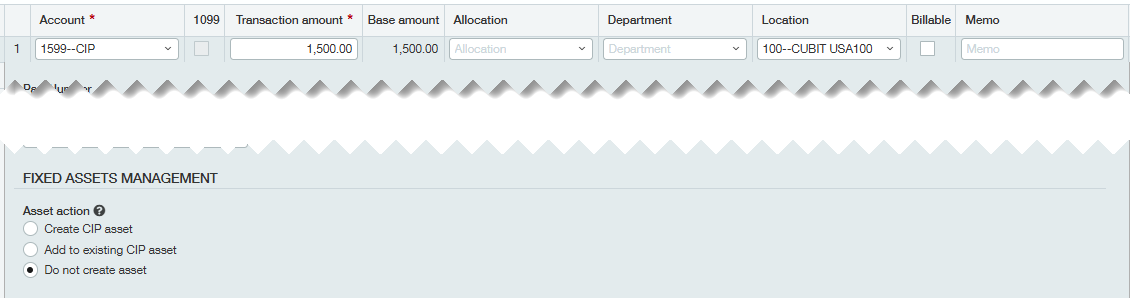
Assigning these CIP costs must be done through AP bills or purchasing transactions. Journal entries, credit card transactions, and AP adjustments don't support adding to or creating CIP assets. There is no way to manually adjust the CIP asset cost after the initial setup and reductions to CIP balances also aren't currently supported.
How do I report on my CIP?
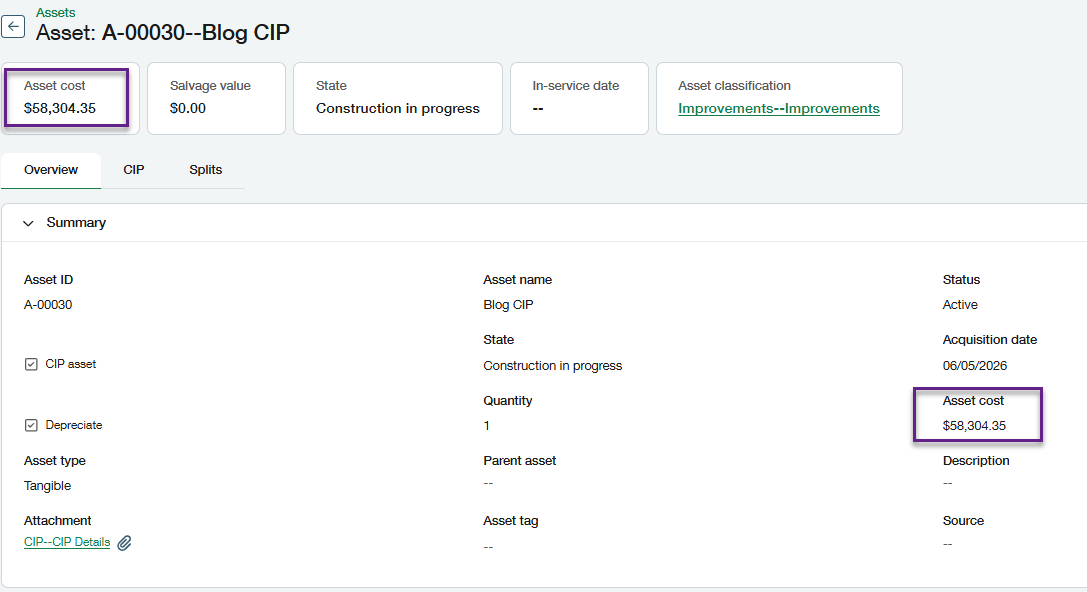
As CIP costs are linked to the CIP asset, the asset cost will automatically update to reflect the new total. You will also have a dedicated tab where you can view CIP details for the asset, including each line amount, the date, vendor, and a hyperlink to the bill.
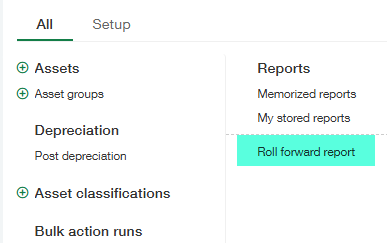
At a high level you can also run the roll forward report and optionally filter just for construction in progress assets to see the total balances summarized or subtotaled by classification.
Tip: If you don’t see this report within the Fixed Asset Management menu, you may need to adjust permissions for the relevant fixed asset users. This was also introduced as part of a Release 1 update.

How do I capitalize my CIP?
Once all costs have been accounted for and the project is ready to be turned into a full-fledged asset, you can use the capitalization features. Capitalization can be done directly on the individual asset as well as to multiple CIP assets at once through a mass update using the new import service. This is helpful in situations where multiple building floors are renovated at the same time, but you want to track and depreciate each floor separately.
From the asset you can click capitalize and be prompted for a capitalization date. This date drives the GL posting to move the full balance from CIP into the applicable asset GL account.

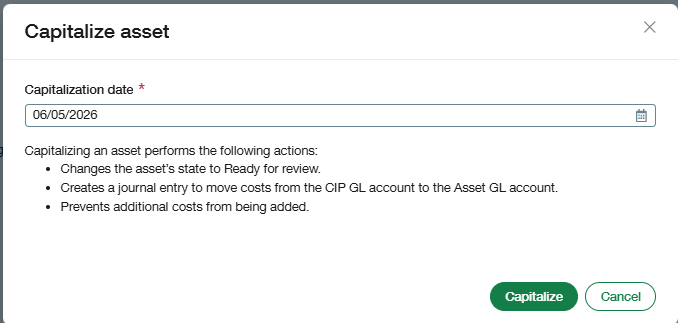
In addition to posting the journal entry, capitalization automatically changes the asset’s status to “in review.” With the asset being “in review,” you can make any necessary changes before placing the asset into service. This includes cost adjustments, adding additional details such as serial numbers, notes, and tags, or modifying dimension codes.
If a mistake is discovered and more costs need to be assigned, the capitalization can be reverted, simply by clicking the three dots in the upper-right corner and clicking “revert capitalization.” Reverting capitalization will automatically delete the entry posted to move from CIP into the asset GL account.

By bringing CIP tracking directly into Fixed Asset Management, organizations can reduce manual work, improve visibility into in-progress balances, and simplify the path to capitalization. Whether you’re setting up CIP for the first time or looking to improve how current projects are tracked, these new capabilities can help create a more efficient and reliable fixed asset process. As organizations continue to look for better ways to manage capital spending and reporting, having CIP functionality built directly into Fixed Asset Management can be a meaningful step forward.
What’s next?
For additional support, or if you are not yet using Sage Fixed Asset Management and want help with implementation, please reach out to your CLA Sage Intacct team.